Are you wondering how to insert captions in Google Docs? In the modern world, every piece of content that is created and pushed over the internet comprises images because human beings respond to visuals. One of the reasons is that content with images creates better engagement and looks visually appealing. Nowadays, many documents are created with Google Docs. And creators often add images to these documents to make them more visually appealing.
But every image has its meaning which is where captions come in. You can insert captions in Google Docs below an image using the Inline Text option in the Text Wrapping pop-up. Another option is to use the Text Box tool in the Drawing Toolbar. Implementing the Caption Maker add-on is also an option. Or you could simply insert a Table for your image and caption.
You caption could be anything like the place, creator name, or something related to the content that makes the reader understand the image and context correctly.
4 Ways to Insert Captions in Google Docs
- Inline Text Caption
- Drawing Toolbar Caption
- Add-on Caption
- Caption Images With the Table feature
We will discuss all these methods step-by-step, including captioning images, which is essential. The steps below are relatively straightforward, even for first-time users of Google Docs.
You can easily follow the steps because some of the tools mentioned are in Google Docs. For others, you have to install third-party apps like add-ons. The add-ons provide more customization options in docs.
All the methods work seamlessly and integrate appropriately into the documents. Now let’s dive into the steps:
Method #1: Inline Text Caption
The Inline Text Caption is the fastest and most widely used way to add captions to an image. Editors usually use it. Therefore, you can use this method directly while editing the document and insert captions for images, objects, and tables.
Below are the steps to use inline text caption.
Steps 1: Open the Google Docs File
Open Google Docs in the Chrome Browser, then sign in with your Gmail ID. In the above section, you will see the option to create a blank document or open an existing document. Now tap on the multicolor plus icon.
Click on File>Open (CTRL+O) in the menu list. You will have several options to upload images, including from your computer. The uploaded image will appear on the document, as shown in the screenshot.
Step 2: Set Up Text Wrapping
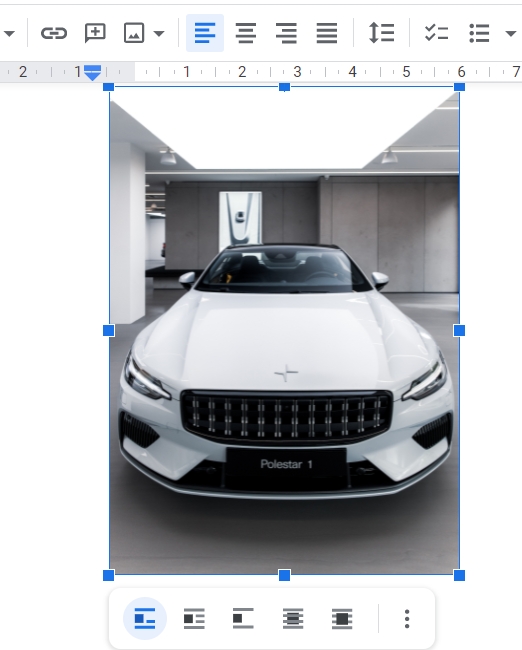
Once you have uploaded and inserted the image in the blank document, tap on the image to select. All the options are going to display in the form of icons. From those icons, select the Inline option, which is the first icon in the row.
Step 3: Insert Caption Under Image
You can add captions below the image in a particular line. You can easily adjust the alignment of your caption to align it with the image. Also, you can align the image and caption in the center of the document.
However, you can use the scale at the top of the window to adjust the Image and Caption alignment. You must simply drag the blue arrow to the alignment you want for the image and caption.
That’s it. You have successfully added inline text captions for your image. If you like this method, you might want to check out the following method, which is more interesting.
Method #2: Drawing Toolbar Caption
Google Docs provides an excellent tool for making customizable captions involving the Drawing Toolbar. It allows you to create, edit, and add different visual objects to a document.
Usually, users use this toolbar when trying something new with their image, like adding an object with a customizable caption, so they don’t mess up their original image.
Below are the steps on how you can use the Drawing Toolbar.
Step 1: Open Google Docs in Chrome
You have to open a blank document in Google Docs. If you already have a document, use that. Any work done via the Drawing Toolbar will open in a new window. Therefore, your original image will not be affected until you save your work.
Step 2: Click on the Insert Tab
You will see an Insert option in your toolbar in your Google Docs window. After you click it, you will have to hover over the Drawing option and click on the New button.
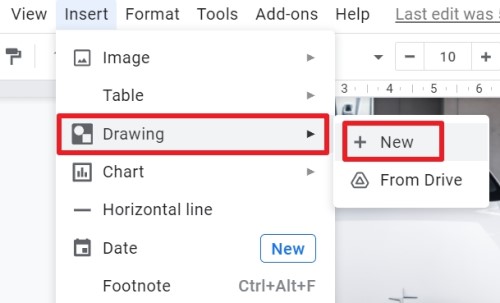
Now, you will have a new drawing window in the center of the main Google Docs window, where you can add the image.
Step 3: Upload and Insert the Picture
In the Drawing Toolbar window, you will see an image icon. Click on that image button to insert the image. Now an Insert image window will open where you can upload the image.
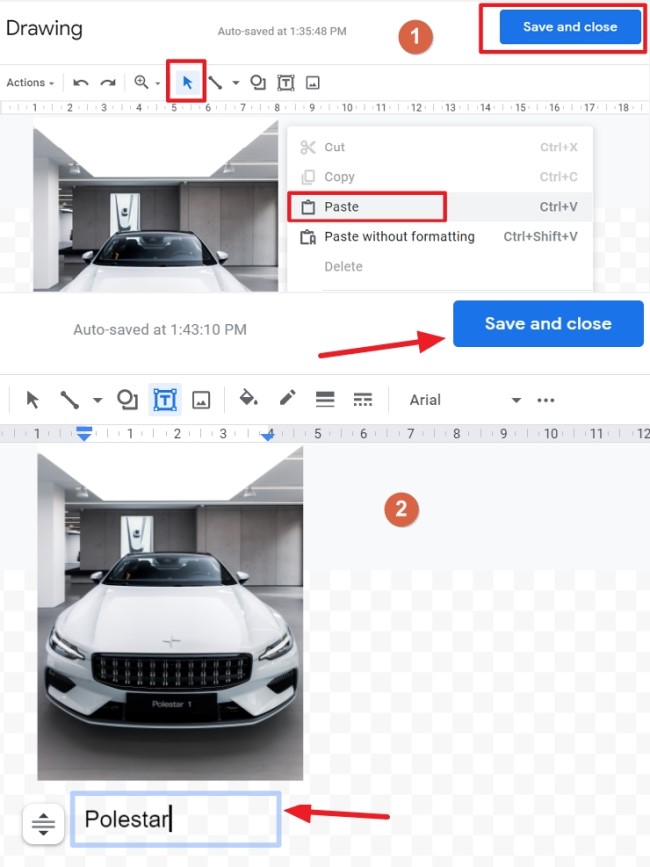
Click on the Choose button, and select the File from the computer to upload it. You can copy the image from the main window and paste it into your Drawing Toolbar Window.
Step 4: Enter the Caption
Tap on the Textbox button on the Image Button’s left side. Click on a blank space to place the Text Box editor, then insert your caption in the box.
To resize the textbox, drag it by the corners or from the left-right sides of the box. Now, after you have your desired textbox, insert your caption and click the Save & Close button in the upper right-hand corner of the window.
Method #3: Add-On Caption
In this method, we must install an add-on in Google Docs. Installing an add-on from the marketplace comes with different features, which help with customization.
We will use the most widely used add-on called caption maker.
Step 1: Open Google Docs
As you already have your image open in your Google Docs document, you can use it for the experiment.
Step 2: Install the Add-On
In the top menu of the tools header, click Add-ons. A drop-down menu will open, so select the Get add-ons option.
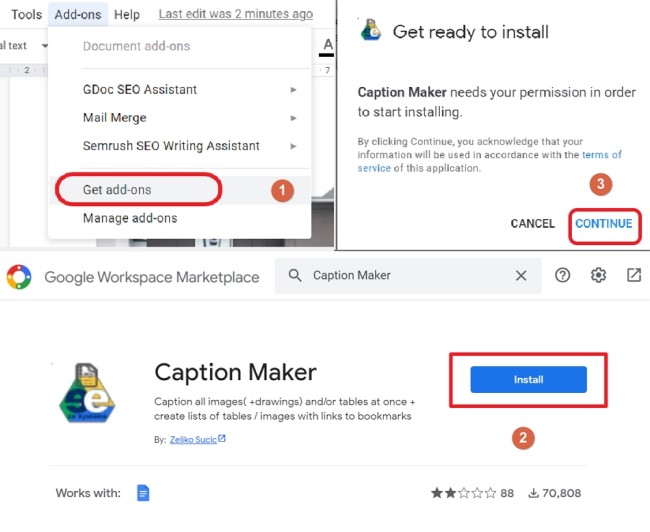
After you click it, a new window will open in the Google Workspace Marketplace. Now type “Caption Maker” in the search bar and press enter. Select the app named Caption Maker from the list of the other apps.
Tap on the Install button to install the add-on in your Google Docs. A confirmation pop-up box will open before the installation.
Click on the “Continue” button to install.
Step 3: Insert the Caption In Caption Maker
Now that you have installed the Caption Maker, click on the add-on option and select “Caption Maker.” Tap on the Start button to open the caption maker.
You will have the caption maker window on the right side of the screen. Click on the “Captionize” button.
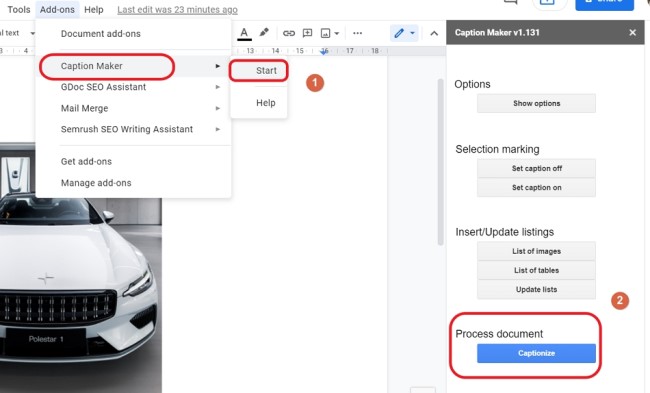
Now the caption maker will add a default predefined caption box under the image. You can easily insert your required caption from here by typing it into the predefined caption box.
Method #4: Caption Images With the Table Feature
In this method, you’ll create a set of tables and then insert the caption and image according to your needs. In one cell, we will place the image. In the other, we’ll insert the caption. We can also make the Table invisible after the setup.
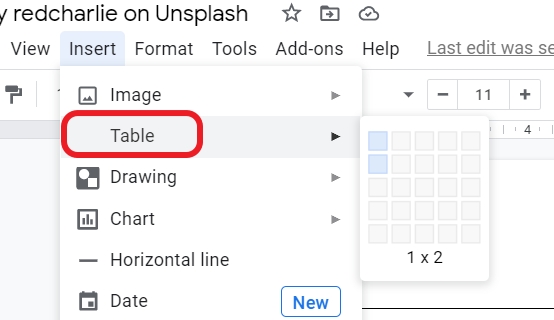
Now, hover over the Insert option in the header toolbar and click on Table. Choose the desired table size with the required row and column.
In the below example, we have a “1 x 2” table, which will work fine with our original image.
As you click on the desired table size, it will automatically be inserted into the document’s blank space. Now you have to drag your image into the upper row of the Table and then insert the caption in the lower row of the Table.
If you want to add an extra row above or below, you can right-click on the row and then select “Insert row above” or “Insert row below”.
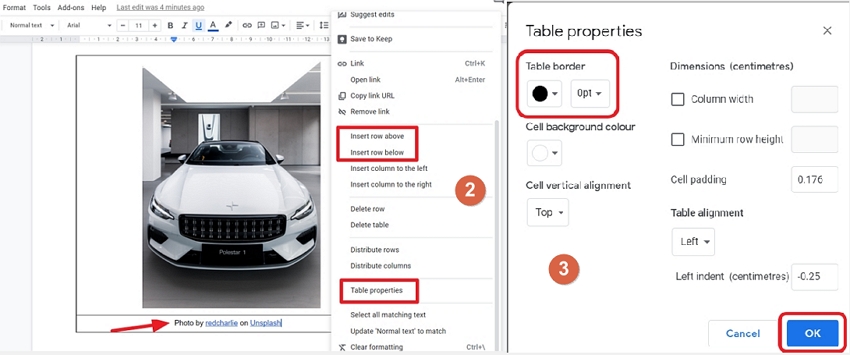
To change the size and dimensions of the Table or the border, you can simply right-click on the row and select Table properties.
And the most important part is if you want to make the Table invisible after the setup. You must select “0pt” in the table border options and then click on the “Ok” button to save the setting.
FAQ
-
How Do I Add an Image Source in Google Docs?
To add image sources in Google Docs:
1. Open a new Google Docs file. You can also use an old document. Just Right-Click on the image, and you will have the option of adding a link. You can also use keyboard shortcuts like (Ctrl+k).
2. Paste the image source link in the search bar, then click on the apply button. You can also add an image source link to a caption with the same process.
3. Select and right-click the text to add the image source link. Again you will see a similar option to add the link. You can also use the keyboard shortcut CTRL+K.
4. You will also have the icon to insert the link in the top header toolset. Select the target and click on the link icon in the top header to insert the image source URL. -
How Do I Add a Comment to an Image in Google Docs?
To add a comment to an image:
1. Simply right-click on the image, and the menu will open with the option of “Comment.” You can also use a keyboard shortcut like CTRL+ALT+M.
2. A pop-up window with your name will open in the lower section of the window. Now you can simply add your comment in the comment section. You can also refer to other users by using @.
3. Similarly, you can select and right-click on the text and press CTRL+ALT+M on your keyboard.
4. You will also have the comment icon in the top header toolset. Select the target and click on the “Comment” icon in the toolset. -
How Do I Cite Images in Google Docs?
To add a Citation Source for an image:
1. Click on the “Tools” button in the top header of the toolset and select the “Citations” option in the menu list.
2. Now, the new citation window will open on the right side of the screen, where you can add information for “source type” and “accessed by”.
3. Source type means where you are taking the information from, like a Book, Article, or Magazine.
4. “Accessed By” means where you will use that source, like Print Media or an Online database.
5. You can select the appropriate options and then fill out the rest of the information. Afterward, click on Add Citation Source. -
How Do I Assign a Comment to Someone in Google Docs?
You can assign a comment to someone in Google Docs. Suppose you want to make your comment visible to someone to inform them about something in the document. In that case, you can tag them in the comment, and they will receive an email in their Gmail account.
Note: You will also receive a notification if someone has set their status to “Out of office.” The condition is you have to have access to their calendar.
1. Open a presentation document in Google Docs.
2. Insert the comment by simply using the method we discussed above.
3. After adding your comment, add “@” with their name or email address. You can also select their name from the suggestions in Google Docs.
4. Select Comment.
Conclusion
This guide tells you about the methods to add and edit captions in Google Docs. Different methods suit different users. You can use some methods directly, while you have to insert an add-on for others.
Again adding captions is essential when creating a document and presentation with images. It allows the reader to have more information about the image. We also add captions to images to provide credit to the creators by inserting their names and the link to their website or social media.
All four methods are incredibly easy, whether you’re a beginner or an advanced user. Our step-by-step guide will help you insert captions in Google Docs seamlessly and effortlessly.
Feel free to comment down below with your queries!

